All links below should open up in a new window.
RV.net - A great forum for research and discussion. (This forum is operated by The Affinity Group, which owns Camping World, Trailer Life, Motorhome magazine, the Good Sam Club, just to name a few. If you see references to one of these forums, they are one in the same.)iRV2.com - A great resource with all sorts of information. Look under "Features" for another great forum.
RVer's Open Forum - And one more good forum.
Here is a forum devoted to pick-up trucks.
Here is another forum for all sorts of trucks. Click on "Sites" to see Chevy, Ford, Dodge and others.
And here is yet another forum dedicated to diesel powered trucks.
NHTSA Guide to Towing a TrailerMountain Directory - Books and CD of mountain grades on state highways and the interstate system.
RV Park Reviews - A great place to post your review of a recent stay at a private, state or membership campground. Also check for reviews of places you might be planning on staying.
Campground Report - A new site also offering reviews of campgrounds and RV parks.
Below are several sites I have found that show state laws regarding towing. Why so many? Well, for some reason, they vary a little bit from site to site in detail and perhaps accuracy. So use them only as a starting point. If you are concerned about anything particular, I suggest contacting the state's Department of Transportation, State Patrol, or some other agency that should know what the laws really are.
State Towing Laws 1
State Towing Laws 2
State Towing Laws 3
Dump Stations
Here are some sources for towing mirrors:
Cipa
McKesh
Power Vision
TTT Mirrors
RV Net Linx - A huge collection of all sorts of RV related links
Rotochok's - A great product to help reduce trailer movement.
The Hughes Autoformer is a good product that will help manage high/low voltage conditions from the power source that can damage your RV electrical systems and components.
The Surge Guard is an excellent surge protector for your RV. It does not manage the incoming electricity like the Autoformer does, but it will shut off the power if the voltage rises or falls below a certain level.
Flying J truck stops.
Find other weigh stations, rest areas, fuel and more here.
Need something to store your electrical cords or water hoses on? Check out the CordPro and CordProXL.
Speaking of cord reels, here is company that sells a reel for coax cable and telephone wire (plus a few other useful products for RV'ers).
Here are two great videos about tires, tire care and how to read the sidewall.
An article for Controlling Sway from Sunline RV.
Taking a road trip? Check out this site before leaving.
Here is a website with some good info and links about hitches, racks and how-to's.
Sunday, February 22, 2009
Campground Memberships
Campground memberships are not for everyone, but they do work for a lot of people. If you are new to the RV’ing lifestyle, I would suggest waiting a year or two before buying a membership. See where you like to go, what kind of camping you like to do, the amenities you like to have when you get there, and how often you go.
Campground membership systems usually call their parks “resorts”. This does not necessarily reflect the level of service or the quality and quantity of amenities. Some resorts may be more pavement than grass, more open space and less trees, or out in the woods where you can hardly see your neighbor. Some will have swimming pools, hot tubs and tennis courts, while others will have just the check-in office and store. Make sure you know what kind of “resort” system you’re buying into.
Here is a list of membership park systems that I have found:
A question that comes up a lot…“Is a campground membership worth it?” The answer depends on how much you go camping (or would like to go), where you like to go and how much will it cost to join. So let’s look at each question separately.
How often?
Take a look back at how often you’ve gone camping in the past. Was it a week or two of vacation plus a few weekends here and there, or were you just an occasional weekend camper? On average, how many days were you out camping the past few years?
Where?
Where did you go, or where would you like to go camping? Are there resorts in these locations that you would be able to use?
Cost
How much does it cost to sign up?What are the annual dues?How long do you have to pay, or how long are you likely to remain a member?And looking back at your previous camping trips, how much per night (on average) did it cost to stay in a campground?
Most membership systems have different types of membership. Thousand Trails for example, has a nation-wide membership, an Eastern or Western US membership, and they also have some smaller regional memberships. Some memberships may limit you to the number of nights that are included with additional nights costing a small extra fee. And some systems may limit the number of consecutive nights that you can stay “in” the system. Each different type of membership will cost a different amount.
Time for the math
Okay, time to break out the calculator and do a little math and figure out how much this membership would cost.
First thing you need to do is estimate how long you think you will remain a member. Since you’ve probably made a sizeable investment in your RV lifestyle, let’s say you’ll be a member for the next 10 years. Take the initial sign-up fee and divide by 10 (or however many years you think you’ll remain a member) to get an annualized cost. Add the annual dues to this, and then divide by the number of nights you expect to be out camping. Now you have your “nightly cost” for the membership.
Is the membership nightly cost more or less than your prior camping trips? Whether it is more or less, you may still have some questions to answer before you decide. Are there resorts located where I would like to go? Do the resorts have the amenities I would like to be able to use? And probably the most critical question…will I use the membership enough to pay for itself?
Answering these questions should give you a pretty good start in making your decision.
Another thing to consider with any membership is, how or when does the membership end? In other words, how do I get out of it? To answer this question, you should talk with the sales representative and carefully read the membership contract so that you understand completely what your options are should you decide in a few years that you no longer want to be a member. BE CAREFUL HERE!!! Some memberships are touted as “lifetime”, and they mean it! There may be no other way out of the contract except to die or sell it to someone else. Some memberships may have a limit to the number of times they can be re-sold, leaving the last buyer “stuck” with the memberhip. Some memberships might be easier to sell than others. So make sure you understand your options for terminating the membership.
Affiliate Memberships
Another feature of many membership systems is what is called the Affiliate Membership. To purchase the affiliate membership, you must first buy a membership at what is called your “home park”. These affiliate systems are comprised of campgrounds that “buy into” the affiliate system in hopes of attracting other customers from membership systems in a location where they may not have a resort.
Affiliate memberships are available from:
Along with the benefits of the affiliate membership comes the buy-in cost and annual dues. Some are more expensive than others, so make sure you check out what you are paying for and figure this into your total cost of membership. Unlike many home park memberships, affiliate memberships are easy to get out of…you just stop paying the yearly dues (check to make sure). But be careful doing this…it may cost you a lot more to get back into it at a future date should you decide to rejoin
New or Used?
Yes, there are used memberships available to buy from current members that “want out”. If you attend a sales presentation at a membership park, ask the sales rep if they have any used or “resale” memberships available. You may be able to save a ton of money doing this.
Another possibility is doing an internet search for “used campground membership” or “campground membership resale” or any other similar phrase. There are specialized brokers and websites (such as Ebay) that deal with buying and selling “used” campground memberships. Again, be careful, read the sales contract thoroughly and make sure you understand it completely! When buying a “used” membership, you may be assuming or taking over the original contract. Make sure you understand what it is that you are buying…the benefits, the restrictions, and the way out!
If taking over an existing membership, get the membership number and talk to the company about that specific membership. Find out the costs, the benefits, the restrictions, and the way out!
If you are thinking about buying a used membership but visit the park beforehand and sit through the sales presentation and don’t buy there, you may not be able to buy a used membership for 1-2 years after attending the sales presentation. I have heard of a few membership systems keeping track of the sales presentation attendees and looking for the names of membership transfer requests. If the name is found on the list, the transfer may be denied.
Getting out!
Okay, I’ve said this enough already, but it’s worth repeating again! This is probably one of the biggest areas of problems I have noticed with campground memberships…how do I get out of it? Make sure you read and understand the membership contract thoroughly, especially the parts concerning how to terminate the membership. Things can and do happen that you don’t expect that could impact your ability to keep enjoying the membership as you had originally intended. Make sure there is “a way out” that is
Discount clubs
You've heard of them...Costco, Sam's Club and the like. But there are some just for RV'ers too! Check them out to see if one would work for you.
All have annual fees and discounted nightly rates at a limited number of participating campgrounds. Unlike a "membership" park or campground, these discount clubs can be dropped at any time by simply not paying the annual renewal fee
Enjoy!
Whether you join a membership system or not, you are bound to enjoy the RV adventure. At a membership system, you may see the same faces all the time, and this can be just fine for many people. Some like the adventure of meeting new people all the time, even if they are not moving around a lot. Either way, you’re bound to make friends and memories that could last a lifetime.
Campground membership systems usually call their parks “resorts”. This does not necessarily reflect the level of service or the quality and quantity of amenities. Some resorts may be more pavement than grass, more open space and less trees, or out in the woods where you can hardly see your neighbor. Some will have swimming pools, hot tubs and tennis courts, while others will have just the check-in office and store. Make sure you know what kind of “resort” system you’re buying into.
Here is a list of membership park systems that I have found:
A question that comes up a lot…“Is a campground membership worth it?” The answer depends on how much you go camping (or would like to go), where you like to go and how much will it cost to join. So let’s look at each question separately.
How often?
Take a look back at how often you’ve gone camping in the past. Was it a week or two of vacation plus a few weekends here and there, or were you just an occasional weekend camper? On average, how many days were you out camping the past few years?
Where?
Where did you go, or where would you like to go camping? Are there resorts in these locations that you would be able to use?
Cost
How much does it cost to sign up?What are the annual dues?How long do you have to pay, or how long are you likely to remain a member?And looking back at your previous camping trips, how much per night (on average) did it cost to stay in a campground?
Most membership systems have different types of membership. Thousand Trails for example, has a nation-wide membership, an Eastern or Western US membership, and they also have some smaller regional memberships. Some memberships may limit you to the number of nights that are included with additional nights costing a small extra fee. And some systems may limit the number of consecutive nights that you can stay “in” the system. Each different type of membership will cost a different amount.
Time for the math
Okay, time to break out the calculator and do a little math and figure out how much this membership would cost.
First thing you need to do is estimate how long you think you will remain a member. Since you’ve probably made a sizeable investment in your RV lifestyle, let’s say you’ll be a member for the next 10 years. Take the initial sign-up fee and divide by 10 (or however many years you think you’ll remain a member) to get an annualized cost. Add the annual dues to this, and then divide by the number of nights you expect to be out camping. Now you have your “nightly cost” for the membership.
Is the membership nightly cost more or less than your prior camping trips? Whether it is more or less, you may still have some questions to answer before you decide. Are there resorts located where I would like to go? Do the resorts have the amenities I would like to be able to use? And probably the most critical question…will I use the membership enough to pay for itself?
Answering these questions should give you a pretty good start in making your decision.
Another thing to consider with any membership is, how or when does the membership end? In other words, how do I get out of it? To answer this question, you should talk with the sales representative and carefully read the membership contract so that you understand completely what your options are should you decide in a few years that you no longer want to be a member. BE CAREFUL HERE!!! Some memberships are touted as “lifetime”, and they mean it! There may be no other way out of the contract except to die or sell it to someone else. Some memberships may have a limit to the number of times they can be re-sold, leaving the last buyer “stuck” with the memberhip. Some memberships might be easier to sell than others. So make sure you understand your options for terminating the membership.
Affiliate Memberships
Another feature of many membership systems is what is called the Affiliate Membership. To purchase the affiliate membership, you must first buy a membership at what is called your “home park”. These affiliate systems are comprised of campgrounds that “buy into” the affiliate system in hopes of attracting other customers from membership systems in a location where they may not have a resort.
Affiliate memberships are available from:
- AOR/ACN – Adventure Outdoor Resorts/Adventure Camping Network
- Coast to Coast
- RPI – Resort Parks International
- ROD – Resorts of Distinction
Along with the benefits of the affiliate membership comes the buy-in cost and annual dues. Some are more expensive than others, so make sure you check out what you are paying for and figure this into your total cost of membership. Unlike many home park memberships, affiliate memberships are easy to get out of…you just stop paying the yearly dues (check to make sure). But be careful doing this…it may cost you a lot more to get back into it at a future date should you decide to rejoin
New or Used?
Yes, there are used memberships available to buy from current members that “want out”. If you attend a sales presentation at a membership park, ask the sales rep if they have any used or “resale” memberships available. You may be able to save a ton of money doing this.
Another possibility is doing an internet search for “used campground membership” or “campground membership resale” or any other similar phrase. There are specialized brokers and websites (such as Ebay) that deal with buying and selling “used” campground memberships. Again, be careful, read the sales contract thoroughly and make sure you understand it completely! When buying a “used” membership, you may be assuming or taking over the original contract. Make sure you understand what it is that you are buying…the benefits, the restrictions, and the way out!
If taking over an existing membership, get the membership number and talk to the company about that specific membership. Find out the costs, the benefits, the restrictions, and the way out!
If you are thinking about buying a used membership but visit the park beforehand and sit through the sales presentation and don’t buy there, you may not be able to buy a used membership for 1-2 years after attending the sales presentation. I have heard of a few membership systems keeping track of the sales presentation attendees and looking for the names of membership transfer requests. If the name is found on the list, the transfer may be denied.
Getting out!
Okay, I’ve said this enough already, but it’s worth repeating again! This is probably one of the biggest areas of problems I have noticed with campground memberships…how do I get out of it? Make sure you read and understand the membership contract thoroughly, especially the parts concerning how to terminate the membership. Things can and do happen that you don’t expect that could impact your ability to keep enjoying the membership as you had originally intended. Make sure there is “a way out” that is
Discount clubs
You've heard of them...Costco, Sam's Club and the like. But there are some just for RV'ers too! Check them out to see if one would work for you.
All have annual fees and discounted nightly rates at a limited number of participating campgrounds. Unlike a "membership" park or campground, these discount clubs can be dropped at any time by simply not paying the annual renewal fee
Enjoy!
Whether you join a membership system or not, you are bound to enjoy the RV adventure. At a membership system, you may see the same faces all the time, and this can be just fine for many people. Some like the adventure of meeting new people all the time, even if they are not moving around a lot. Either way, you’re bound to make friends and memories that could last a lifetime.
Bicycles
How do you carry all those bicycles you want to take along with you on your trip? The receiver is taken up by the trailer hitch, or the truck bed has the fifth wheel hitch in it and there isn’t much room left. What do you do?
Well, there are a couple of options available to carry those bicycles and tow your trailer at the same time.
Inside
An obvious choice, but perhaps not practical depending on the type of trailer or the type of bicycle or bicycle riding you do. You may want the bicycles to be cleaner than what they might be after a good day’s ride. But inside is an option.
Out back
What about on the back of the trailer somewhere? But where, and how? There are 3 commercially available options more specific for RV’s, a few ready-made solutions and a few custom options. Let’s look at the commercial products first.
Spare tire mounted bicycle rack
This type of bicycle rack fits over the top of the spare tire that is mounted to the rear bumper and usually only holds 1-2 bicycles.
Bumper mounted bicycle rack
These bicycle racks usually hold 1-2 bicycles, but there are some that can hold up to 4.
Ladder mounted bicycle rack
This type is more of a “hanger” than a rack. It hooks over the ladder on the back of the trailer and holds (hangs) the bicycles by their tires. Only made for 1-2 bicycles.
These types of racks are less expensive than the following options and range in price from $40 to $150. If you use one of these types of carriers, make sure that whatever you attach it to (bumper or ladder) is capable of handling the extra weight of the rack and the bicycles. Trailer bumpers are not well known for their ability to support a lot of extra weight. They make a great location to store the sewer hose and hold a spare tire, but the extra weight of a loaded bicycle carrier might be too much for it. Check with your dealer or manufacturer to find out for sure.
Bumper mounted receiver
There are a few adapters that act as a receiver tube that can be bolted onto the rear bumper of some trailers. They are the standard 2” size, and will accept all sorts of accessories, like bicycle racks and cargo boxes. This would allow you to use the same bicycle rack or other accessories behind the trailer that could be used behind the tow vehicle when the trailer is not hitched up. Since this receiver tube would be more versatile and less expensive, it is a popular option for people that already have a bicycle rack they use in the tow vehicle’s receiver, but it must be used with caution when on the back of a trailer.
Since this option can accommodate more than a 2-bicycle carrier, it may be too much weight for the rear bumper to handle. Again, check with your dealer or the manufacturer to find out how much weight the bumper can handle.
Pop-ups
Any more than 2 bicycles plus the carrier on the back could dramatically impact the tongue weight, towing characteristics and towing safety. I would check with your dealer for options for loading bicycles on the roof of the pop-up. Many of the bicycle racks on top of cars and SUV’s will also work on pop-ups.
Travel trailers
In a similar way, but not to the same extreme, too much weight on the back of a travel trailer could impact the amount of tongue weight and therefore affect handling and towing characteristics. The larger the trailer, usually the more weight on the tongue and the less of an impact from a bicycle rack on the back. But for shorter, lighter trailers, this could be as big a problem as for the pop-ups. One of the RV-related bicycle racks with 1-2 bicycles should be okay, but check the capacity of the bumper or ladder first.
Fifth-wheels
Not much of a problem here. An extra 50-75 pounds from a couple of bicycles and a rack will have little impact on the pin weight and should not affect handling. Make sure the bumper or ladder is strong enough to support the weight.
Mirrors
When driving, it is always a good idea to be able see clearly in front, to the sides and to the rear. When towing a trailer or fifth wheel, the inside rear view mirror becomes useless, so you must rely on your outside mirrors to see what is behind you. When towing a pop-up, how well you can see out of any mirror will depend on the height of the mirror, and the height and width of the trailer.
Do you need “towing” mirrors?
As mentioned before, it will depend on where and how high the mirror is compared to the height and width of the trailer. Ideally, you want to be able to see what is behind and along side the trailer.
First, let’s see how high and how far apart the outside mirrors are on the tow vehicle. With the front driver and passenger side windows rolled down, use a tape measure to see how far apart the mirrors are. Measure to both the inside (A) and outside (B) of the mirror glass. Now measure the distance from the ground to the bottom edge of the mirror glass. Compare these measurements with the height and width of the trailer. (If the trailer is equipped with an awning, the support poles may also block your rear vision on the passenger side.)
If the trailer width is less than the mirror measurement A, then you will probably not need any additional mirror extensions.
If the trailer width is between mirror measurements A and B and the trailer does not have an awning, you may or may not need mirror extensions. If the trailer does have an awning, you will probably need an extension on the passenger side.
If the trailer width is more than mirror measurement B, you will need mirror extensions. If the trailer has an awning, you may need an extra-long extension on the passenger side.
For pop-up trailers, you may be able to use the inside rear-view mirror to see what is behind you better than the outside mirrors. Check the maximum height and width of the trailer and compare to the mirror positions. Different mirrors than what are listed here may be required to give you adequate rear vision. Ask your dealer for other recommendations.
Mirrors
After-market mirrors or mirror extensions are available to fit most vehicles and range from $20 to $500 a pair. Below is a list and description of the most commonly used or available mirrors and mirror extensions. Links to manufacturer websites are also included.
Clip-on mirrors
Prime Products and Cipa Mirrors are leading manufacturer of this type of mirror. These mirrors should strap on to most standard mirrors and are the least expensive type at $15-$20 per pair.
Pros: Inexpensive. Lightweight. Incorporates stock mirror break-away feature
Cons: Some complaints of excessive vibration. Some complaints that the brackets interfere with mirror glass movement.
Slip-on mirrors
Cipa Mirrors makes mirror extensions that slip over your existing mirror. Actual size depends on the vehicle, but mirror glass ranges from 4”-5” in height and width. Extends outside edge of mirror about 6” from stock mirror. Cost is $25-$40 depending on the vehicle.
Pros: Easy on/off. Fewer complaints of vibration. Incorporates stock mirror break-away feature.
Cons: Slightly smaller mirror glass size.
Accessory mirrors
This type of mirror would be attached to the vehicle separate from the stock mirror.
McKesh Mirrors are probably the widest known for this type of mirror. Special hooks clamp over the window openings at the top and another hook on a strap attach to the bottom edge of the door. Turn a lever to tighten the strap and you’re all set. These mirrors offer probably the most extension of any mirror on the market and should fit any vehicle without much trouble. $110-$120 per pair.
Pros: Simple on/off. Large mirror glass.
Cons: Some complaints about vibration. No break-away feature which could damage door. Some complaints about hooks scratching windows. Some complaints about adjusting device scratching vehicle if not installed correctly.
Replacement mirrors
There are several manufactures of this type of mirror.
Cipa Mirrors also makes replacement mirrors as well as the slip-on and clip-on types. The replacement mirror glass is large, 10”x10”, and comes in manual, electric and electric heated. Passenger side glass is flat glass, not convex, as most stock mirrors are. These mirrors manually extend 4-1/2”, or from 19” to about 25” from the vehicle. Has fold-away/break-away feature. $275-$350.
Power Vision Mirrors are replacement mirrors that electrically extends 5”, or from 16” to 21” from the vehicle. Glass size is 10-1/2” x 6-1/2”, and are available in electric and electric heated. Passenger side glass is flat glass, not convex, as most stock mirrors are. Installation of an additional switch is required for electrical extension feature. Has fold-away/break-away feature. $430-$500.
Telescopic Trailer Tow (TTT) Mirrors by Schefenacker are replacement mirrors that manually extend 4-1/2”, or 17-1/2” to 22” from the vehicle. This mirror incorporates a built-in manually adjustable blind spot mirror (convex, 3-1/2” x 4-1/4”) along with the regular mirror glass (8-3/4” x 7-1/4”). They are available in electric and electric heated, and can also come equipped with rear-facing turn signal indicator lights and forward-facing marker lights (additional wiring may be required). Interchangeable color-matched covers are also available. Has fold-away/break-away feature. $300-$450.
Pros: Retain most if not all electrical functions as stock mirrors. Extendable from non-towing to towing modes. Uses stock mounting holes and wiring (for most features).
Cons: Price!
Propane, on or off while traveling?
Another question that gets asked a lot is “Can I travel with the propane on?” This question is usually tied to using the refrigerator (and sometimes the furnace) while traveling down the road. The simple answer is, yes you can. But it also raises a couple of other questions…is it safe and is it necessary?
Can you?
The propane appliances (fridge, furnace and water heater) are designed to draw the air needed for combustion with propane from the outside and to vent any exhaust to the outside. The outside covers should be designed to prevent wind from blowing out any pilot light or the flame once ignited. So, operation while on the road should not be a problem.
Necessary?
So, you’re out camping and it’s time to move on to the next stop and you’re worried about the items in the fridge and freezer. Will they be okay with the fridge off until you get to your next stop and can get plugged back into electricity? Probably. Most refrigerators will stay cold long enough to keep food from spoiling. If the fridge has been on and the items have been inside it for at least 24 hours, things should remain cold enough for the 8-12 hours you may be without electricity without spoiling. Items in the freezer may thaw slightly. Ice cream may soften up and ice cubes could turn back to plain old water.
A lot will depend on the outside temperature and how well the RV is insulated. It could take 1-3 hours for the inside temperature to equal the outside temperature. If it is below 80 degrees for most of your travel time, you should be fine without having the refrigerator on. If the temperature is above 80 degrees for most of your travel time, you should be okay for a short period of time…say 4-6 hours.
If you will be on the road longer than 6 hours or if temperatures will be above 90 for most of your travel time, you may want to consider purchasing a remote wireless thermometer. A sensor can be places in the fridge and/or freezer and can be monitored from the driver (or passenger) seat. Should the temperature fall below a certain level (that you choose), you could pull over at the next available rest area or other safe place and turn the refrigerator on using propane and let it cool back down. Be prepared, this could take an hour or two, maybe more depending on how much it warmed up and how cold you want it.
Of course, you can always travel with the fridge and propane on and not worry much about it (except where noted below), but I would stop occasionally and make sure things are operating correctly. There is always a chance that the wind and air turbulence going down the road at 60 mph could blow out the flame from the propane.
But what if it’s cold outside? Obviously the fridge and its contents are no longer a concern, but what about everything else? Do you need to run the furnace to keep things warm enough? Again, it could depend on how long you will be traveling, how cold it is outside and how well the RV is insulated. In most cases, this should not be a problem either. Most foods that do not require refrigeration should not be damages should they become frozen for a short time. (How do you think food gets to Minnesota in the dead of winter?) Most electronic equipment has a safe storage temperature down to 0 degrees, but operating temperatures are usually well above freezing. If you need to run the furnace while traveling, make sure all vents are unobstructed or close them off if they are.
Safe?
This is the factor that gets the debate heated at times…is it safe to travel with the propane on? Most people will agree that it is safe to be traveling down the road and have the propane on and operating the refrigerator or furnace. And the new OPD valve and connecting hoses make it even safer than before.
However, almost everyone agrees that you should turn both the propane tank valves and, more importantly, all the propane appliances (fridge, furnace and water heater) off before entering a fueling station. Most states have laws that require any open flame source be turned off while fueling. The “open flame” in this case would be any pilot lights or anything that causes a spark (such as the igniter). Although fires at gas stations are rare, they do occur. I have chatted online with 2 firefighters who say they have either fought or investigated fires at gas stations that were blamed on an RV having a propane appliance on. So make sure you turn the appliance off, not just the tank valve!!!
There could also be portions of your travel where you are not allowed to have the propane on, either at the tank or the appliance, such as driving through a tunnel, across a bridge or on a ferry. There may also be tunnels, bridges or other portions of the road that have restrictions against transporting flammable liquids (other than the fuel for the vehicle). In most cases, this restriction is posted well in advance, but I have heard a few stories where people have claimed they saw no notice of the restriction until it was too late to do anything about it. If you will be traveling into unfamiliar territory, it might be best to check ahead with the state’s Department of Transportation (or similar office) to see if there are any restrictions along your route.
Here are a couple good web pages that also talk about propane:
Pate 1
Page 2
The home page for the articles above is at http://www.rvroadie.com/ under “Technical Articles > Propane and Alarm Systems > Propane 101” and “Technical Articles > Propane and Alarm Systems > To run the fridge on the road or not?”
Here is another article written by the RV Alliance America insurance company.
Water - The Basics
There are basically two ways to get the water into your RV…
by connecting a hose to the city water inlet,

or by filling your fresh water holding tank.
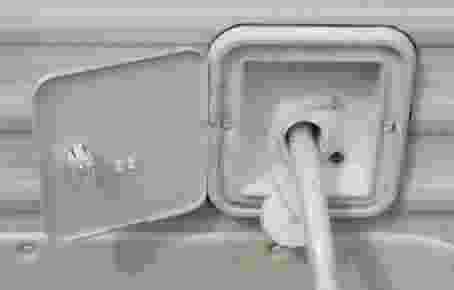
Use a hose that is safe to use for drinking water. If you connect to the city water inlet, always use a pressure regulator.
If you fill the fresh water holding tank, make sure the drain valve (if there is one) is closed. If the tank has a vent tube or valve, the tank will fill faster if the vent is opened. If the water chugs, glugs or spits back at you when filling the tank, either the tank does not have a vent, the vent is plugged or the vent is shut off. Turn the water faucet down a bit and let the tank fill at its own slow pace.
Using the water
City water
If you are hooked up to the campground water supply, it’s pretty simple. Just turn on the faucets. At first, the water may sputter a bit due to air inside the lines, so let the water run until all the air has been purged from the lines. Don’t forget to do the hot water faucets as well, especially if you drained the tank after your last outing.
Holding tank
If you are not hooked up to a fresh water supply, then you will need to use the water from your fresh water holding tank. If you know you are going someplace where you will need to do this, it might be best to prime the water lines (as above) before you leave home. That way, you won’t be using any of the water from the holding tank.
Fill the fresh water holding tank to the desired level. Go inside the RV and turn on the water pump. It will run until it thinks the lines have been primed, but there could be some air in the lines as well. Open the faucet that is closest to the water pump until the air has been purged from the lines. (If you didn't prime the lines before leaving home, you may want to prime them now.) Once this is done, the pump should stop running and not run again until you open a faucet. If you hear the pump running when there isn’t a faucet open, you may have a leak somewhere, or the hot water tank pressure relief valve may have opened a bit. Check it out to make sure everything is okay.
Remember, your water supply is limited to the amount of water in the holding tank, so make sure you do your best to conserve water whenever possible. When the holding tank is running dry, the pump may speed up, or the flow of water may slow down or stop. Turn off the power to the pump at this point.
Speaking of power, the water pump draws its power from the batteries. If you do not have electrical hookups, you will also need to conserve battery power. Turn off the water pump and anything else that will draw power from the batteries when they are not needed.
Hot water
Unlike the water heater in your house, the one in your RV needs to be handled differently.
Before lighting the gas pilot or turning on the electrical portion, MAKE SURE the tank is filled with water! Check that any bypass valves used for winterizing are in the correct position and have allowed the tank to fill with water.
If the hot water is too hot or not hot enough, look for the instructions for your water heater that should have come with your RV for how to adjust the water temperature.
You may see some water dripping from the hot water tank access panel on the outside of the RV. This is not uncommon and is caused by the pressure relief valve opening slightly to relieve the pressure caused by the expanding water inside the tank.
Where does it go?
All the water that goes down a drain goes into a holding tank. Flushing the toilet should go into what is called the “black” water tank. All the sinks and shower should drain into what is called the “gray” water tank.
RV’s use the same style of plumbing that is used in a home. “P-traps" are used to keep odors from coming back through the pipes from the holding tank. During storage, or extremely hot conditions, the P-traps could dry up and allow odors back into the RV. Use a good air-tight seal on all drains to help keep odors under control. The toilet usually dumps directly into the black tank, so there is no P-trap to keep odors out, but the valve for the toilet usually does a good job of keeping the odors out. During storage, or extremely hot conditions, make sure to keep plenty of water in the toilet bowl to help keep the seal moist and odors out. When winterizing, use the special RV anti-freeze in the P-traps and toilet bowl.
In many RV’s, the fresh, gray and black tanks are different sizes. Usually, the fresh water tank is the largest followed by the gray then the black. When this is the case, you may find yourself filling up the gray tank faster than expected. At these times, it would help if you could utilize the black tank for gray (sink) water. One of the easiest ways to do this is by placing a small tub in the sink. When it becomes full enough, carry it to the bathroom and pour it down the toilet.
Sooner or later, the gray and black holding tanks will become full and you will need to dump them.
The right tank
Is the toilet really the only thing that drains into the black tank? Most of the time, yes, but sometimes, no. Sometimes the manufacturers get lazy (or cheap) and drain the shower or bathroom sink into the black tank because it is easier. Some manufacturers will go a step above and have a separate gray tank for the kitchen and one for the bathroom. A simple test can tell you exactly where the water is draining to.
You’ll want to be at a campground where you have sewer hookups. You’ll also need one of those clear sewer hose elbows.
First dump and rinse the tanks like you normally would and close the drain valves. Next, mix up a gallon of water with something that will add some color to it, like Kool-Aid. Red and green might make good colors for this test. Pour about half a gallon down one drain at a time. Each time, going outside and opening a drain valve to see (here is why you need the clear elbow) which tank it is coming from.
If things aren’t draining into the right tank, it’s not that big of a deal. It just means you’ll need to watch your water usage and keep an eye on your tank monitor panel a little more closely.
Things NOT to put down the drains
Common sense should apply here, but just for a reminder, NO...
Weight
Keep in mind that water weighs roughly 8.25 pounds per gallon. Carrying around all that extra weight could have an effect on how your rig handles. It is probably more critical for travel trailers due to the possible location of all of the tanks and how they could affect tongue weight. Many trailer manufacturers do not keep this in mind when designing the trailer, so it is left up to the buyer.
Most trailers that I have seen have their fresh water holding tank relatively close to the kitchen area. Another clue to their location could be where the fresh water tank fill is located. Black tanks are almost always directly under the toilet. And the gray tanks can be almost anywhere.
One way to find out for sure is to look underneath the trailer. But if the manufacturer has covered things up underneath, you’ll have to use one of the other methods.
So how does tank location affect tongue weight?
Simple.
If a tank is located forward of the trailer axles, a portion of its weight will end up as tongue weight. This could overload the tow vehicle or cause handling problems from too much weight on the rear axle and not enough weight on the front axle.
Tanks located to the rear of the axles will lighten the tongue weight. This could lead to trailer sway.
by connecting a hose to the city water inlet,
or by filling your fresh water holding tank.
Use a hose that is safe to use for drinking water. If you connect to the city water inlet, always use a pressure regulator.
If you fill the fresh water holding tank, make sure the drain valve (if there is one) is closed. If the tank has a vent tube or valve, the tank will fill faster if the vent is opened. If the water chugs, glugs or spits back at you when filling the tank, either the tank does not have a vent, the vent is plugged or the vent is shut off. Turn the water faucet down a bit and let the tank fill at its own slow pace.
Using the water
City water
If you are hooked up to the campground water supply, it’s pretty simple. Just turn on the faucets. At first, the water may sputter a bit due to air inside the lines, so let the water run until all the air has been purged from the lines. Don’t forget to do the hot water faucets as well, especially if you drained the tank after your last outing.
Holding tank
If you are not hooked up to a fresh water supply, then you will need to use the water from your fresh water holding tank. If you know you are going someplace where you will need to do this, it might be best to prime the water lines (as above) before you leave home. That way, you won’t be using any of the water from the holding tank.
Fill the fresh water holding tank to the desired level. Go inside the RV and turn on the water pump. It will run until it thinks the lines have been primed, but there could be some air in the lines as well. Open the faucet that is closest to the water pump until the air has been purged from the lines. (If you didn't prime the lines before leaving home, you may want to prime them now.) Once this is done, the pump should stop running and not run again until you open a faucet. If you hear the pump running when there isn’t a faucet open, you may have a leak somewhere, or the hot water tank pressure relief valve may have opened a bit. Check it out to make sure everything is okay.
Remember, your water supply is limited to the amount of water in the holding tank, so make sure you do your best to conserve water whenever possible. When the holding tank is running dry, the pump may speed up, or the flow of water may slow down or stop. Turn off the power to the pump at this point.
Speaking of power, the water pump draws its power from the batteries. If you do not have electrical hookups, you will also need to conserve battery power. Turn off the water pump and anything else that will draw power from the batteries when they are not needed.
Hot water
Unlike the water heater in your house, the one in your RV needs to be handled differently.
Before lighting the gas pilot or turning on the electrical portion, MAKE SURE the tank is filled with water! Check that any bypass valves used for winterizing are in the correct position and have allowed the tank to fill with water.
If the hot water is too hot or not hot enough, look for the instructions for your water heater that should have come with your RV for how to adjust the water temperature.
You may see some water dripping from the hot water tank access panel on the outside of the RV. This is not uncommon and is caused by the pressure relief valve opening slightly to relieve the pressure caused by the expanding water inside the tank.
Where does it go?
All the water that goes down a drain goes into a holding tank. Flushing the toilet should go into what is called the “black” water tank. All the sinks and shower should drain into what is called the “gray” water tank.
RV’s use the same style of plumbing that is used in a home. “P-traps" are used to keep odors from coming back through the pipes from the holding tank. During storage, or extremely hot conditions, the P-traps could dry up and allow odors back into the RV. Use a good air-tight seal on all drains to help keep odors under control. The toilet usually dumps directly into the black tank, so there is no P-trap to keep odors out, but the valve for the toilet usually does a good job of keeping the odors out. During storage, or extremely hot conditions, make sure to keep plenty of water in the toilet bowl to help keep the seal moist and odors out. When winterizing, use the special RV anti-freeze in the P-traps and toilet bowl.
In many RV’s, the fresh, gray and black tanks are different sizes. Usually, the fresh water tank is the largest followed by the gray then the black. When this is the case, you may find yourself filling up the gray tank faster than expected. At these times, it would help if you could utilize the black tank for gray (sink) water. One of the easiest ways to do this is by placing a small tub in the sink. When it becomes full enough, carry it to the bathroom and pour it down the toilet.
Sooner or later, the gray and black holding tanks will become full and you will need to dump them.
The right tank
Is the toilet really the only thing that drains into the black tank? Most of the time, yes, but sometimes, no. Sometimes the manufacturers get lazy (or cheap) and drain the shower or bathroom sink into the black tank because it is easier. Some manufacturers will go a step above and have a separate gray tank for the kitchen and one for the bathroom. A simple test can tell you exactly where the water is draining to.
You’ll want to be at a campground where you have sewer hookups. You’ll also need one of those clear sewer hose elbows.
First dump and rinse the tanks like you normally would and close the drain valves. Next, mix up a gallon of water with something that will add some color to it, like Kool-Aid. Red and green might make good colors for this test. Pour about half a gallon down one drain at a time. Each time, going outside and opening a drain valve to see (here is why you need the clear elbow) which tank it is coming from.
If things aren’t draining into the right tank, it’s not that big of a deal. It just means you’ll need to watch your water usage and keep an eye on your tank monitor panel a little more closely.
Things NOT to put down the drains
Common sense should apply here, but just for a reminder, NO...
- Food scraps. Most kitchen sinks have some sort of strainer/plug for them. Use it!
Grease or oil from cooking. And definitely not the automotive kind!
Caustic cleaners or solvents. You probably don’t need these in your RV anyway.
Flammable liquids.
And for the toilet, all of the above plus no feminine hygiene products, paper towels or anything you didn’t eat or drink first.
Weight
Keep in mind that water weighs roughly 8.25 pounds per gallon. Carrying around all that extra weight could have an effect on how your rig handles. It is probably more critical for travel trailers due to the possible location of all of the tanks and how they could affect tongue weight. Many trailer manufacturers do not keep this in mind when designing the trailer, so it is left up to the buyer.
Most trailers that I have seen have their fresh water holding tank relatively close to the kitchen area. Another clue to their location could be where the fresh water tank fill is located. Black tanks are almost always directly under the toilet. And the gray tanks can be almost anywhere.
One way to find out for sure is to look underneath the trailer. But if the manufacturer has covered things up underneath, you’ll have to use one of the other methods.
So how does tank location affect tongue weight?
Simple.
If a tank is located forward of the trailer axles, a portion of its weight will end up as tongue weight. This could overload the tow vehicle or cause handling problems from too much weight on the rear axle and not enough weight on the front axle.
Tanks located to the rear of the axles will lighten the tongue weight. This could lead to trailer sway.
Sanitizing the Fresh Water system
Before using the fresh water tank for the first time in a new RV, and before the first outing of the year, it is recommended that you sanitize the fresh water system. It is a relatively simple process...
The water that will run through the water lines inside the RV will end up in your gray water holding tank. If you are worried about the amount of water that may end up in your gray water tank, you may want to do this procedure at an RV park or somewhere with sewer hook-ups.
Also, since you will be filling and draining your fresh water tank at least 3 times, this would mean a lot of water will be going onto the ground, some of which will smell like bleach. You may want to rig up some sort of hose from the fresh water tank drain to the sewer hook-up.
If you're going to head for an RV park so you can use their hook-ups (like on your first trip out each spring), call ahead and ask where the campground's waste water goes, explaining why you are asking. If it goes into a city sewer system, you'll be okay. But if it goes into the campgrounds own septic system, this may not be a good thing for the campground. Too much bleach in a septic system can cause problems and may cause the system to shut down, leaving many of your fellow campers upset. If the waste water goes into a sewer system, do steps 1-10 at home before you leave. That way, as you travel, the water will be sloshing around just a bit in the holding tank, and you will probably be ready for step #11 (draining) when you arrive.
There are other ways you could do this at home, if you are connected to a city sewer system.
There are special end caps for the sewer drain on the RV that are designed to hook up to a regular water hose. Pick up an inexpensive water pump of some sort (Camping World has one for $35) so you can pump the water into the sewer system at your house. You'll have to get a little creative here with the hoses, pump and fittings, but it should not be too much of a problem.
So, what do you do if you found this information too late and have used too much bleach? The information I have found suggests using either 1 quart of white vinegar or 1/2 cup of baking soad for every 15 gallons of water capacity. Use the same process as above for mixing the solution, getting into your fresh water tank and pumping it through the system.
- If you have any in-line water filters built-in to the water lines inside the RV, you will either want to remove them or, hopefully, they have a shut-off valve in the water line before entering the filter.
- Turn off the water heater and let it cool.
- Add up the capacity of your entire fresh water system…that includes the holding tank and the water heater. Multiply the result by 0.13 to determine the number of ounces of unscented bleach you will need. For example, say you have a 40 gallon holding tank and a 6 gallon hot water tank for a total of 46 gallons. Multiplied by 0.13 equals 5.98 ounces of bleach needed. (It’s okay to round up a bit, but not too much.)
- Fill the fresh water holding tank to about 1/3 full.
- Mix the bleach with water in a one gallon container and pour it into the fresh water holding tank. (This prevents straight bleach from contacting anything.)
- Fill the fresh water holding tank completely
- Turn on the on-board water pump. You do not want to be connected to the city water supply
- Turn on one faucet at a time and let the water run until you can smell the bleach solution, then turn it off. Do this for each hot and cold water faucet. Don’t forget the outside shower and the toilet.
- Turn off the water pump.
- Top off the fresh water holding tank and let everything sit for at least 4 hours.
- Drain the hot water tank and put the plug back in.
- Drain the fresh water holding tank.
- Fill and drain the fresh water holding tank at least twice to rinse out the bleach solution.
- Fill the fresh water holding tank again, but don’t drain it this time.
- Turn the water pump back on. This will cause the hot water tank to fill.
- Turn on each faucet and let the water run for several minutes to completely flush out the bleach solution.
The water that will run through the water lines inside the RV will end up in your gray water holding tank. If you are worried about the amount of water that may end up in your gray water tank, you may want to do this procedure at an RV park or somewhere with sewer hook-ups.
Also, since you will be filling and draining your fresh water tank at least 3 times, this would mean a lot of water will be going onto the ground, some of which will smell like bleach. You may want to rig up some sort of hose from the fresh water tank drain to the sewer hook-up.
If you're going to head for an RV park so you can use their hook-ups (like on your first trip out each spring), call ahead and ask where the campground's waste water goes, explaining why you are asking. If it goes into a city sewer system, you'll be okay. But if it goes into the campgrounds own septic system, this may not be a good thing for the campground. Too much bleach in a septic system can cause problems and may cause the system to shut down, leaving many of your fellow campers upset. If the waste water goes into a sewer system, do steps 1-10 at home before you leave. That way, as you travel, the water will be sloshing around just a bit in the holding tank, and you will probably be ready for step #11 (draining) when you arrive.
There are other ways you could do this at home, if you are connected to a city sewer system.
There are special end caps for the sewer drain on the RV that are designed to hook up to a regular water hose. Pick up an inexpensive water pump of some sort (Camping World has one for $35) so you can pump the water into the sewer system at your house. You'll have to get a little creative here with the hoses, pump and fittings, but it should not be too much of a problem.
So, what do you do if you found this information too late and have used too much bleach? The information I have found suggests using either 1 quart of white vinegar or 1/2 cup of baking soad for every 15 gallons of water capacity. Use the same process as above for mixing the solution, getting into your fresh water tank and pumping it through the system.
Water Hoses
There are many types of hoses on the market, but as far as your RV water hose is concerned, you want to buy one that is safe to use for drinking water. That means that most green garden hoses are out!
Hoses that are safe to use for a drinking water supply hose are usually white, or there could be something printed on a label that says it is safe to use for drinking water.
There are typically two types of hoses, round and flat.
Round hoses are like your typical garden hose…round. One disadvantage to the round hose is it can take up a lot of storage space. A product that may help solve the problem of taking up too much storage space is the CordProXL. I haven’t tried this product, but it looks like it could work just fine. Originally designed for household extension cords, the new XL version seems to have many applications for RV use.
Here are the round hoses I used to use.
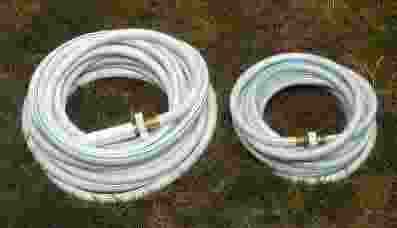
A flat hose usually comes on some sort of reel that takes up very little space. One disadvantage of the flat hose is that the hose must be unwound completely to use it. Here is one type of flat hose available at Camping World, and here is another.
The flat hoses are a bit more expensive than the round ones, but if storage space is at a premium, it may be worth the extra money for a flat hose.
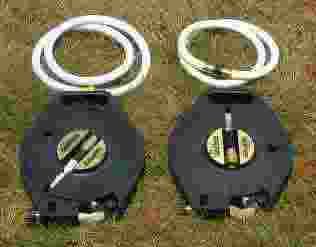
I have a 25' and a 50' flat hose plus two 4' hoses.
My usual setup is to connect a 4' hose to the campground water faucet, then the water filter, the pressure regulator, then whatever length of hose I need to get to the city water inlet. It's usually the 25' hose, but I have been close enough on occasion to use another 4' hose. If the campground water faucet is close to the rear of the trailer, I obviously won't need 25' of hose to finish the job, but I will have to unreel the entire hose. In that case, I route the hose towards the front of the trailer and loop it back towards the rear underneath where the slide-out overhang is. This way, all of that excess hose is out of the way. I usually need to use the 50' hose to fill the fresh water holding tank.
When hooking all of this up, I will turn the water on and let it run through each piece before connecting the next, just to give it a little bath to clean it out a bit.
To connect the hose to the RV, I use this type.
At a minimum, you should use at least a 90 degree elbow such as this one to reduce stress on the city water inlet connection
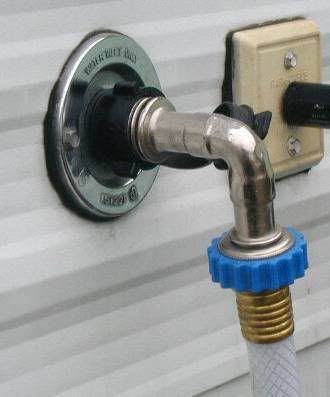
NEVER, EVER use your fresh water hose for anything else!!! Remember that the water that goes through that hose will be the water you could be drinking or cooking with.
Water Pressure Regulators
Let’s start with a few definitions.
Water pressure – a measurement of how much pressure is behind the water pushing it through the pipes. This can be measured by a pressure gauge.
Water flow – how much water is coming out of the hose, faucet or shower head. This can be measured by timing how long it takes to fill some sort of container, usually a one gallon bottle or jug. (Flow is usually expressed in terms of “gallons per minute”.)
To some extent, the amount of water pressure does determine the water flow, but only up to a certain point. Not enough pressure will result in not much water flow. Too much pressure could damage the water lines inside the RV. Although low water flow can make for an interesting shower, too much water pressure is more of a concern.
Most water lines inside an RV are only rated up to 50-60 psi or less. (Check with your RV dealer or manufacturer to find out what yours is rated for.) Every RV’er should be equipped with some sort of water pressure regulator since you never know what the water pressure will be at the campground. There are two basic types.
The inexpensive one, and,
The better one.
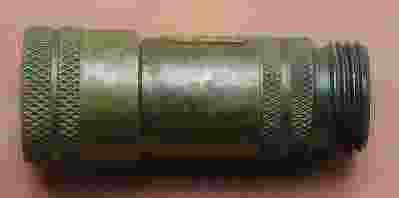
The inexpensive one
The inexpensive one you can get at almost every RV parts supply and some Wal-mart’s. They cost about $10-$15, and are pre-set at about 40 psi. Although the inexpensive brass type does a good job of restricting the pressure, it also restricts the water flow a bit. Because they are somewhat cheap, they also don’t last as long as the better ones.
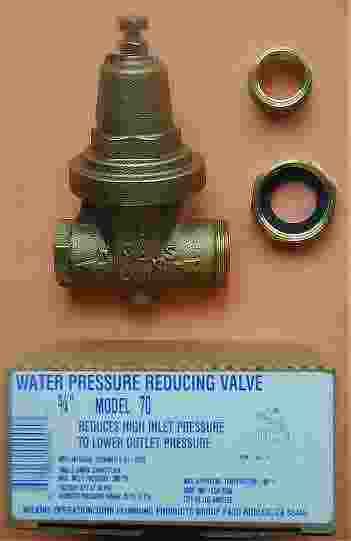
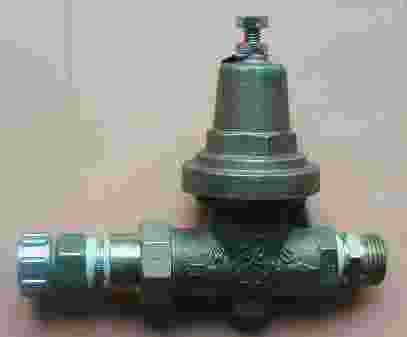
The Better One
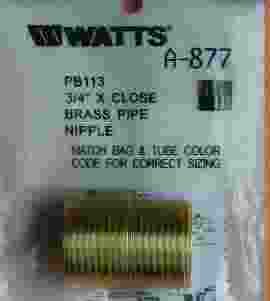
The better ones are available from most home improvement stores (like Home Depot or Lowes) or any good plumbing supply store. (Wilkins and Watts are a couple brand-names to look for.) This type of pressure regulator is an “entire household” type of pressure regulator and does a good job of restricting the pressure without restricting the flow. They require additional fittings for the specific application. To use this type of regulator, you would need a male hose fitting and a female hose fitting. Total cost with fittings will be $30-$40 depending on where you buy it. Although these types of pressure regulators are often pre-set to 50 psi, I would suggest purchasing a separate pressure gauge ($10) to make sure, and to make adjustments when necessary.
Below are some photos of the parts you will need. Prices are from Home Depot.
Wilkins Pressure Regulator, $29.88
Watts fittings:
PBGH1, $3.94

PB113, $2.49
A-665, $2.96
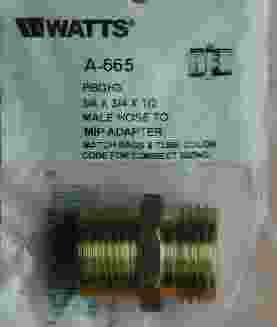
The final product, total cost $39.27 plus tax.
ALWAYS use a pressure regulator, even when at home! You never know what the pressure coming from that faucet might be. For example, I didn't know that the water pressure coming from my outside water faucet at home was 90 psi until I was putting in a sprinkler system for my yard several years ago.
Here is a link to a similar web page. The interesting thing on this web page is the chart near the bottom that compares the different types of water pressure regulators this person used. It definitely shows that the household type of water pressure regulator has a better flow of water. Now I haven't done as much testing as this person did, but I did do some.
I attached my hose to the house water faucet (which I already know has more than enough pressure). I screwed my old brass RV pressure regulator on the other end of the hose, screwed my pressure gauge on next and then screwed it into the city water inlet. With the water turned on, my water pressure gauge showed 40 psi just before entering the city water inlet.
At the kitchen sink, I turned the faucet on full and let it run for 1 minute, then shut it off. I used a piece of tape to mark the water line. Then I went back outside and switched the brass RV regulator for the Wilkins regulator and calibrated it for the same 40 psi. Back inside, I drained the sink and repeated the test. This time, the water came to the top of the tape mark I had made previously. That’s a 1” difference in the kitchen sink. I’m sure there would be similar results in the shower, and I’m sure there would be an even greater difference if I bumped the pressure up to 45 or 50 psi, but I was just comparing the flow rate at the same pressure for the two regulators.
Water pressure – a measurement of how much pressure is behind the water pushing it through the pipes. This can be measured by a pressure gauge.
Water flow – how much water is coming out of the hose, faucet or shower head. This can be measured by timing how long it takes to fill some sort of container, usually a one gallon bottle or jug. (Flow is usually expressed in terms of “gallons per minute”.)
To some extent, the amount of water pressure does determine the water flow, but only up to a certain point. Not enough pressure will result in not much water flow. Too much pressure could damage the water lines inside the RV. Although low water flow can make for an interesting shower, too much water pressure is more of a concern.
Most water lines inside an RV are only rated up to 50-60 psi or less. (Check with your RV dealer or manufacturer to find out what yours is rated for.) Every RV’er should be equipped with some sort of water pressure regulator since you never know what the water pressure will be at the campground. There are two basic types.
The inexpensive one, and,
The better one.
The inexpensive one
The inexpensive one you can get at almost every RV parts supply and some Wal-mart’s. They cost about $10-$15, and are pre-set at about 40 psi. Although the inexpensive brass type does a good job of restricting the pressure, it also restricts the water flow a bit. Because they are somewhat cheap, they also don’t last as long as the better ones.
The Better One
The better ones are available from most home improvement stores (like Home Depot or Lowes) or any good plumbing supply store. (Wilkins and Watts are a couple brand-names to look for.) This type of pressure regulator is an “entire household” type of pressure regulator and does a good job of restricting the pressure without restricting the flow. They require additional fittings for the specific application. To use this type of regulator, you would need a male hose fitting and a female hose fitting. Total cost with fittings will be $30-$40 depending on where you buy it. Although these types of pressure regulators are often pre-set to 50 psi, I would suggest purchasing a separate pressure gauge ($10) to make sure, and to make adjustments when necessary.
Below are some photos of the parts you will need. Prices are from Home Depot.
Wilkins Pressure Regulator, $29.88
Watts fittings:
PBGH1, $3.94
PB113, $2.49
A-665, $2.96
The final product, total cost $39.27 plus tax.
ALWAYS use a pressure regulator, even when at home! You never know what the pressure coming from that faucet might be. For example, I didn't know that the water pressure coming from my outside water faucet at home was 90 psi until I was putting in a sprinkler system for my yard several years ago.
Here is a link to a similar web page. The interesting thing on this web page is the chart near the bottom that compares the different types of water pressure regulators this person used. It definitely shows that the household type of water pressure regulator has a better flow of water. Now I haven't done as much testing as this person did, but I did do some.
I attached my hose to the house water faucet (which I already know has more than enough pressure). I screwed my old brass RV pressure regulator on the other end of the hose, screwed my pressure gauge on next and then screwed it into the city water inlet. With the water turned on, my water pressure gauge showed 40 psi just before entering the city water inlet.
At the kitchen sink, I turned the faucet on full and let it run for 1 minute, then shut it off. I used a piece of tape to mark the water line. Then I went back outside and switched the brass RV regulator for the Wilkins regulator and calibrated it for the same 40 psi. Back inside, I drained the sink and repeated the test. This time, the water came to the top of the tape mark I had made previously. That’s a 1” difference in the kitchen sink. I’m sure there would be similar results in the shower, and I’m sure there would be an even greater difference if I bumped the pressure up to 45 or 50 psi, but I was just comparing the flow rate at the same pressure for the two regulators.
Water Filters
There are basically two types of water filters, sediment and contaminant.
Sediment filters will filter out the little specs of sand, dirt, rust and other similar particles. From what i have seen, these are in the 3-5 micron filtration range. This type of filter usually does not restrict the water flow very much.
Contaminant filters will filter out such things as arsenic, bacteria, lead, mercury and other contaminants. These types of filters have a 0.5-1 micron filtration range and may restrict water flow somewhat more than the sediment filters.
Depending on the brand, either type of filter may also reduce the smell, taste or amount of any chlorine in the water. Some brands, such as many RV related brands, combine both functions into one filter.
Neither type of these filters will purify the water! This would require special treatment, which I won’t get into here, but these types of filters will not make unsafe water safe to drink.
At a minimum, I would suggest some sort of sediment filter to catch any dirt or sand that might find its way into your water hoses, or to catch any rust that might be in the water pipes from the campground or its water supplier.
The contaminant filter is a bit different.
If you use the campground water supply for doing dishes or taking a shower, you probably don’t need a contaminant filter.
If you use bottled water for drinking, cooking or brushing your teeth, you probably don’t need a contaminant filter.
If you use the campground water supply for drinking, cooking or brushing your teeth, you may want to have a contaminant filter because…you may not know where the water is coming from (of course you can always ask).
Some campgrounds get their water from a nearby city or town which is usually treated and safe to drink, while other campgrounds may get their water from a well, a lake or a river nearby and treat the water themselves. Regardless of where the water comes from, things can happen in the treatment process that could allow contaminants to pass through the system and get to your water faucet. (Ever hear on the news where a city or town is urging residents to boil their water because something went wrong?) However, it is more likely that problems will crop up in the water system of a campground that gets its water from a well, lake or river simply because they may not monitor it as well as a bigger city or town would, or something out of the ordinary gets into their water supply.
Many of the newer RV's have a separate water spout on the kitchen sink that is connected to an in-line water filter, usually a contaminant filter, to be used for drinking water. If you have one of these water spouts in your RV, check out the filter, if there is one. This could cut down the need for a separate contaminant filter on the outside.
If you use a separate sediment filter and a separate contaminant filter, put the sediment filter first in line.
As with the water pressure regulators, some RV related water filters will reduce water flow. Check out the whole-household water filter systems available at home improvement stores (like Home Depot or Lowes), a good plumbing supply store or even Sears or Wal-mart. These filters or systems will cost a little less than the RV related brands, they should be easier to find replacement cartridges for while on the road and most will do just as good of a job as the RV related brands if not better. Because you will be attaching these to your water hose, don’t forget to get the extra fittings you will need to hook them up.
Now, where do you put the water filter...before or after the pressure regulator? I would suggest putting the filter before the pressure regulator. That way there is more pressure to push the water through the filters and maintain a good flow of water through the rest of the system. I use a short 4' section of hose from the campground water faucet to the filters and straight to the pressure regulator, then I have the rest of the hose to get to the RV.
Read the instructions carefully, paying particular attention as to how often you will need to change them and how to store them. (Since most household filters would be constantly “wet”, you may need to store them that way. Make sure you have a way to do this, such as a zip-lock baggie or hose end-cap to seal them off at the connections.)
Okay, I'm not a water filter expert. These are just some of the things I have learned about water filters and water systems. Most major water filter manufacturers have websites you can check out to get more information than what might be on their packaging. Do some research on your own and make your own decision on what type of water filter system is best for your needs.
Emergency Water Supply
If you live in an area that is prone to natural disasters like tornadoes, hurricanes, floods or earthquakes, you probably have some sort of emergency supply kit with food, water and other emergency supplies you might need. (If you don’t, you should!)
What if the campground or RV park you are at has their own mini disaster and the water supply is disrupted for some period of time? Maybe a construction project or accident cuts off the water supply for a day, or mayby there is some contamination problem and people are required to boil the water before using it. What will you use to wash your dishes or flush the toilet?
Uh, what about the fresh water holding tank? Got any water in there just in case something happens at the campground? If not, maybe you should. You don’t necessarily have to fill up the fresh water holding tank all the way, but at least put some water in there.
I used an empty milk jug to figure out how much water each kitchen sink would hold (about 4 gallons), how much the bathroom sink would hold (about ½ gallon) and how much the toilet bowl would hold (about 1 gallon). So now I can estimate how much water a meal of dishes uses or a flush of the toilet uses.
If there was a water shortage or outage of some sort, we could always use paper plates, but there could still be pots and pans to clean. We might end up using 3-4 gallons to wash and rinse. Hand washing, toilet usage and a few other things during a day might use another 3-5 gallons. I’d probably head for the nearest store for some bottled water for drinking and cooking so we could use the holding tank for the other things. All totaled, we could end up using 5-10 gallons of water per day for our family of 4. So I’d probably put about 20 gallons of water in my tank, just for that unexpected emergency.
Do your own calculations and see what you come up with. If you’re tight on weight limits (water weighs 8.25 pounds per gallon) and can’t carry the water with you as you travel, fill up the tank when you get there to the desired level and use it the last day you’re there.
Quieting the Water Pump
Does your water pump make a lot of noise when you open a faucet?
One source of the noise could be how it is mounted or attached to the RV. There should be some rubber between the pump base and the RV
Another source of the noise could be the way the pump is connected to the rest of the internal plumbing.
If you’re not a do-it-yourself handy person, take your RV to a service center and ask them to insert some flexible tubing to the water pump on both the inlet and outlet sides (if it isn’t already there).
If you are a do-it-yourselfer, what you will need will vary slightly depending on how you want to do this. In my case I didn’t want to cut the existing plumbing lines (in case something went wrong with my little project). Here is my setup and what I did to quiet the noise.
The water pump in my trailer is located under the kitchen sink, screwed to the floor. It already had the rubber underneath so nothing was needed there. The supply line from the fresh water holding tank (also right under the kitchen area and below the water pump) is about a 1” white flexible tubing, so nothing needed here. But the outlet side of the water pump was connected to the rigid plumbing, which is where the noise was coming from.
With a visit to my local Home Depot, I picked up the parts I would need. I purchased a 20" braided water faucet line and a Watts 1/2" nipple (#A-835). I wrapped both ends of the brass nipple with teflon tape and screwed one end into the faucet line.
Since the water pump was going to have to be relocated slightly, I unscrewed the pump from the floor and disconnected the outlet side. Then I wrapped the outlet nipple with some teflon tape and screwed the end of the faucet line without the nipple on it to the water pump, screwed the other end with the nipple to the existing trailer pipe fitting and screwed the pump back onto the floor
If your water pump has rigid pipe/tubing coming from the holding tank, you can do something similar with more flexible tubing and a few different fittings.
Below are some photos of this project.
BrassCraft braided faucet line, 20"Watts 1/2" nipple (#A-835
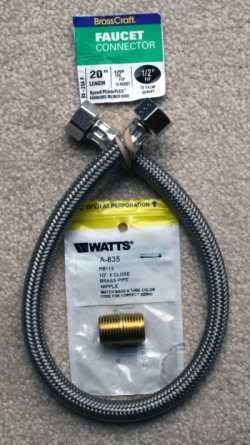
The finished project
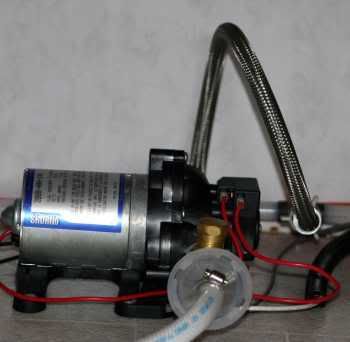
Winterizing
If you live in a climate where the temperatures stay above freezing, then you can skip this section.
For the rest of us that live in climates where the temperatures drop below freezing during the winter, this is an important step for the survival of your RV’s water system.
The basic goal is remove as much water from the plumbing system as possible. There are some things you should consider doing on your last trip out for the year:
Air
A source for the air is needed. Most gas stations have an air hose you could use, if you can get to it with your RV. You could also purchase your own air compressor. I had the small 2 gallon electric compressor shown below (about $90) before buying our trailer. It does a great job of filling up bicycle tires and car tires, but it just isn’t convenient for blowing out the water lines. I used it until I bought the larger 15 gallon tank compressor (about $180). The 2 gallon compressor would need to cycle several times before I felt that most of the water was out of the lines. This would take about an hour. But with the 15 gallon compressor, I turn it on, let if fill up the tank, wheel it to the trailer and let it blow! Now it takes about 15-20 minutes.
If you use an air compressor, make sure it is an “oil-less” type. Otherwise you may end up with some funny tasting water that you may not be able to get rid of.
A 2 gallon compressor

A 15 gallon compressor
To use air, you will need a special adapter for your city water inlet, like this one.

Just screw it into your city water inlet.
If you are using a source for the air that does not have an outlet pressure regulator that you can adjust (like at a gas station), this is where one of those cheaper water pressure regulators would come in handy. Screw the adapter into the regulator and then screw the regulator into the city water inlet. You don’t want to be filling up the water lines with air at a higher pressure than what they can handle.

If you are using an air compressor, you should be able to adjust the outlet pressure. Set it for 40 psi and you’re ready to go. If you cannot adjust the outlet pressure, get one of the cheaper water pressure regulators and screw the adapter into it and then screw the regulator into the city water inlet.
It is possible that using air to blow the water out of the lines may not do as good of a job as you would like. And you may not find this out until spring or the next time you go to use your RV and discover a water leak from a cracked or broken pipe. And there are a few places, like the drains, where you will want to use the RV anti-freeze to protect them. In addition to, or instead of using air, you may want to consider using
RV Antifreeze
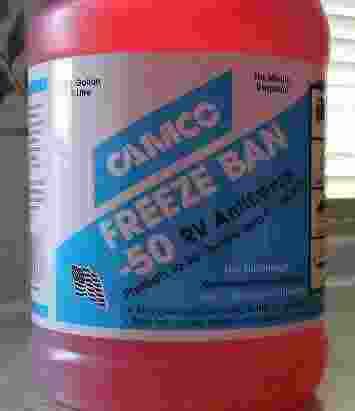
RV anti-freeze is a special type of anti-freeze. It is not like the kind you put in your car’s radiator, so DO NOT USE automotive anti-freeze for this process!!!
Unlike the automotive anti-freeze, RV anti-freeze is safe to drink in small quantities. If some of it were to remain in the lines after you had flushed it out for your next trip, it won’t hurt you. It may not taste real good, but it won’t hurt you.
There are three ways to get the RV anti-freeze into the water system.
The first method would be to pour the RV anti-freeze into the fresh water holding tank and use the water pump to pump it through the system. One major problem with this technique is that the supply line from the fresh water holding tank may not be in the best spot to pick up the RV anti-freeze that is in the tank. It could take several gallons to accomplish the task. And you will need to do a thorough rinsing of the tank before you use it for fresh water storage. Therefore, I don’t recommend this method.
The second method is to use a hand pump specially designed for this task. One end of a hose connected to the hand pump goes into the bottle of RV anti-freeze while the end of another hose attaches to the city water inlet. Then it’s just a matter of pumping the RV anti-freeze into the RV water lines. But if you’re like me (lazy), this sounds like a lot of work.
The last method is to install a special kit so you can use the water pump that is already in your RV to suck the RV anti-freeze out of the bottle and into your water lines.

Since the RV anti-freeze isn’t cheap (usually $2-$3 a gallon), you don’t want to be filling up your hot water tank with the stuff (and you really don’t need to) if you can avoid it. And you can, by installing a hot water tank bypass kit. Even if you pay a service center to install it for you, the savings from not having to buy the extra 6-10 gallons to fill up the water heater will pay for the installation, eventually.
The Procedure
Whether you use air or RV anti-freeze, the process is basically the same
If you have a hot water tank bypass installed, make sure the valves are in the correct position. If you don’t have a bypass kit installed, you may want to consider installing one. Otherwise, you will need to fill the hot water tank with anti-freeze to get the anti-freeze through the hot water lines.
If you have any in-line water filters, such as under the sink, either remove them or turn off the valve that is usually found in the supply line for the filter before pumping the RV anti-freeze through the lines. (If you are using air to blow out the lines, you won't have to worry about this step.)
Go through the RV and open each faucet, one at a time, both hot and cold, for all sinks, showers and the toilet.
For the rest of us that live in climates where the temperatures drop below freezing during the winter, this is an important step for the survival of your RV’s water system.
The basic goal is remove as much water from the plumbing system as possible. There are some things you should consider doing on your last trip out for the year:
- Open all faucets, open the low point drains (if equipped) and don’t forget to step on the toilet flusher to get as much water out of the system
- Drain all the holding tanks and hot water heater tank.
- Flush the gray and black tanks thoroughly. Do not use any toilet chemicals.
Air
A source for the air is needed. Most gas stations have an air hose you could use, if you can get to it with your RV. You could also purchase your own air compressor. I had the small 2 gallon electric compressor shown below (about $90) before buying our trailer. It does a great job of filling up bicycle tires and car tires, but it just isn’t convenient for blowing out the water lines. I used it until I bought the larger 15 gallon tank compressor (about $180). The 2 gallon compressor would need to cycle several times before I felt that most of the water was out of the lines. This would take about an hour. But with the 15 gallon compressor, I turn it on, let if fill up the tank, wheel it to the trailer and let it blow! Now it takes about 15-20 minutes.
If you use an air compressor, make sure it is an “oil-less” type. Otherwise you may end up with some funny tasting water that you may not be able to get rid of.
A 2 gallon compressor
A 15 gallon compressor
To use air, you will need a special adapter for your city water inlet, like this one.
Just screw it into your city water inlet.
If you are using a source for the air that does not have an outlet pressure regulator that you can adjust (like at a gas station), this is where one of those cheaper water pressure regulators would come in handy. Screw the adapter into the regulator and then screw the regulator into the city water inlet. You don’t want to be filling up the water lines with air at a higher pressure than what they can handle.
If you are using an air compressor, you should be able to adjust the outlet pressure. Set it for 40 psi and you’re ready to go. If you cannot adjust the outlet pressure, get one of the cheaper water pressure regulators and screw the adapter into it and then screw the regulator into the city water inlet.
It is possible that using air to blow the water out of the lines may not do as good of a job as you would like. And you may not find this out until spring or the next time you go to use your RV and discover a water leak from a cracked or broken pipe. And there are a few places, like the drains, where you will want to use the RV anti-freeze to protect them. In addition to, or instead of using air, you may want to consider using
RV Antifreeze
RV anti-freeze is a special type of anti-freeze. It is not like the kind you put in your car’s radiator, so DO NOT USE automotive anti-freeze for this process!!!
Unlike the automotive anti-freeze, RV anti-freeze is safe to drink in small quantities. If some of it were to remain in the lines after you had flushed it out for your next trip, it won’t hurt you. It may not taste real good, but it won’t hurt you.
There are three ways to get the RV anti-freeze into the water system.
The first method would be to pour the RV anti-freeze into the fresh water holding tank and use the water pump to pump it through the system. One major problem with this technique is that the supply line from the fresh water holding tank may not be in the best spot to pick up the RV anti-freeze that is in the tank. It could take several gallons to accomplish the task. And you will need to do a thorough rinsing of the tank before you use it for fresh water storage. Therefore, I don’t recommend this method.
The second method is to use a hand pump specially designed for this task. One end of a hose connected to the hand pump goes into the bottle of RV anti-freeze while the end of another hose attaches to the city water inlet. Then it’s just a matter of pumping the RV anti-freeze into the RV water lines. But if you’re like me (lazy), this sounds like a lot of work.
The last method is to install a special kit so you can use the water pump that is already in your RV to suck the RV anti-freeze out of the bottle and into your water lines.
Since the RV anti-freeze isn’t cheap (usually $2-$3 a gallon), you don’t want to be filling up your hot water tank with the stuff (and you really don’t need to) if you can avoid it. And you can, by installing a hot water tank bypass kit. Even if you pay a service center to install it for you, the savings from not having to buy the extra 6-10 gallons to fill up the water heater will pay for the installation, eventually.
The Procedure
Whether you use air or RV anti-freeze, the process is basically the same
If you have a hot water tank bypass installed, make sure the valves are in the correct position. If you don’t have a bypass kit installed, you may want to consider installing one. Otherwise, you will need to fill the hot water tank with anti-freeze to get the anti-freeze through the hot water lines.
If you have any in-line water filters, such as under the sink, either remove them or turn off the valve that is usually found in the supply line for the filter before pumping the RV anti-freeze through the lines. (If you are using air to blow out the lines, you won't have to worry about this step.)
Go through the RV and open each faucet, one at a time, both hot and cold, for all sinks, showers and the toilet.
- If using air, you’re looking for just air to be coming out of the faucet. Once it stops spitting water, you can close the faucet.
- If using RV anti-freeze, you’re looking for it to come out of the faucet. That’s why it is usually pink in color (and often referred to as “the pink stuff”). Once you see it, let it continue to run for about 15 seconds to make sure it has completely filled up the line.
Don’t forget about any outside plumbing fixtures you might have, like the outside shower.
Once the anti-freeze has been run through all the lines, open at least one hot and one cold water faucet to relieve the pressure.
Also pour about 1 cup of RV anti-freeze down each drain to help prevent the P-trap from freezing up. Somewhere along the way, pour an extra cup down a sink drain to make sure there is some in the gray water holding tank to keep the valve from freezing.
And don’t forget about the toilet! Flush 1 cup down the toilet into the black tank to keep the valve from freezing, and then pour another cup into the bowl to cover up the seal and prevent it from freezing and drying out.
If you use the RV anti-freeze, before you take your next trip, you will want to thoroughly flush the water system. You should sanitize the water system each spring, or if you are just taking a mid-winter trip somewhere, you may skip adding the bleach, but do a thorough flush of the system before using the water.
Thursday, February 19, 2009
Holding Tanks
Almost all travel trailers, fifth wheels and motor homes have holding tanks for the fresh, gray and black water. Pop-up tent trailers may only have a small fresh water holding tank and no holding tanks for gray or black water.
The fresh water tank is for just that, fresh water.
The “gray” tank holds the water that goes down the drain in the sinks and shower.
The “black” tank holds the waste and water from the toilet. This tank needs to be treated with chemicals to break down the solid waste and to control odors. Pop-up trailers usually use a “cassette” toilet that still needs some chemical treatment to combat odors and break down the waste.
Chemicals
There are special chemicals you should use, especially in the black tank, to reduce odors and the buildup of solids in the tank, which would cause you problems down the road. There are many brands and types on the market, from powder to liquid. Regardless of the type, it is usually recommended (or required by the campground) not to use chemicals that contain formaldehyde, which is a chemical that is harmful to some septic systems. I prefer the liquid type because I can also put a little in the gray tank via one of the sinks to help control some of the odors that can come from there under the right circumstances. Since the chemicals are also designed to help lubricate the dump valves, this is another reason for putting a little in the gray tank.
Most of the black tank chemicals advertise that 4 ounces will treat a 40-gallon tank, but there are times where you could use more or less than 4 ounces for that 40-gallon tank. Some brands require a “double dose” in hot climates (Arizona in the summer). But what if you’re just going camping for the weekend? Are you going to fill up that 40-gallon tank in one weekend? Possible, but doubtful.
Here is what I do at the end of the weekend. When I’m ready to leave, I dump and rinse the black and then the gray tank (more in this later). When done outside, I go back into the trailer and flush the toilet 5 times (using the one lever to fill the bowl, about 1 gallon, and then flush with the other lever). On the last flush, I add just 2 ounces of chemical to the bowl. This is enough water to cover the bottom of the tank and will slosh around on the drive home allowing the chemicals to “attach” themselves to any solids that might be left in the tank and clean them up a bit.
If I am on a trip and staying a day or two here and a day or two there, I’ll wait until the black tank is 2/3’s full before dumping. It is only a little extra weight to be hauling from one campground to the next, but it gives the chemicals a chance to work on what they are supposed to do…break down the solids.
If you park your RV in a warm or hot location while not in use, you may want to add water to both black and gray holding tanks occasionally to keep the dump valves from drying out. Since I already know that my toilet bowl holds about 1 gallon (I used a milk jug to measure it), I use that as the gauge for how much water may have evaporated from the holding tanks. When I park the trailer and don’t know when I’ll be using it again, I’ll fill up the toilet bowl about half way and check it occasionally. When it is almost empty, I will fill and flush the toilet two or three times, figuring that there is more surface area of water in the holding tanks, which makes it easier for the water to evaporate faster. Same thing for the gray tank. The bathroom sink holds about half a gallon and each side of the double sink in the kitchen holds about 4.5 gallons. I fill the bathroom sink all the way and the 2 sinks in the kitchen about half way. When half of the water has evaporated, I pull the drain plug on all the sinks and refill. This helps prevent odors from backing up through the pipes because by this time, the P-traps have also dried up. Keeping water in the sinks and toilet also act as an odor barrier. And don’t forget the shower drain. It may not be possible to keep water in the bottom of the shower, but plug the drain when not in use and pour water down the drain at the same time you are draining the sinks.
Before leaving for a trip, check the toilet for any odors coming from the black tank. If you smell any unpleasant odors, go ahead and add maybe an ounce of chemical and a few gallons of water to slosh around on your way. Check again on your arrival at your destination. If you still have odors, you could either repeat adding a little chemical and water or dump and retreat the tank. And if you have filled the toilet bowl and sinks to use as an evaporation monitor, don’t forget to drain them before you leave on your trip. You don’t want the water sloshing around.
Dumping the tanks
When you arrive at your destination, you can go ahead and hook up the sewer hose to the RV and to the dump hookup if you like (or you can wait and do it when you need to dump), but leave the dump valves closed until you need to dump the tanks. This will do a couple things. First, it will prevent odors from the campground sewer system from backing up into your RV. Second, it will give the chemicals in the tanks a chance to do their job.
Watch the monitor panel inside the RV for when your tanks are getting full. If it is getting close to your departure date and the gray tank is getting full, go ahead and dump some of it if you need to, but don’t empty it completely. You’ll want some of the gray water to use as a rinse of the sewer hose after you dump the black tank. You can let both tanks get completely full before you need to dump them, but you don’t have to if you don’t want to. Just make sure you leave some in the gray tank to rinse the sewer hose after dumping the black tank.
The recommended sequence of dumping the tanks is, first the black, then the gray. The water from the gray tank will act as a rinse of the sewer hose. Many RV’ers also recommend rinsing the tanks after dumping, and there are several products on the market to do that with. Here are links to just a few:
Sewer Solution
Flush King
Quickie Flush w/Accessory Kit (sorry, no direct link, but available from most RV supply stores). Sometimes you'll see both pieces sold as a No Fuss Flush.
The first two are devices that attach to the tank dump pipe and backfill water into the tanks. The Quickie Flush is something that is partially inserted into the tank that has a multi-directional spray nozzle that is inside the tank with the connecting hose on the outside of the tank. Although the Quickie Flush requires some installation work (which is relatively simple), it uses less water than the other products.
There are also a variety of “wands” that can be inserted through the toilet into the black tank which reportedly also do a good job of rinsing the tank, but this would involve attaching them to a hose and getting the hose and wand into the RV. Personally, I prefer to do this job completely from outside the trailer.
When dumping the tanks, it would be a good idea to wear some rubber or disposable gloves to protect your hands when handling the sewer hose and connections. When finished dumping, use the water faucet or hose outside to rinse the gloves off or throw the disposable ones away. Place the gloves and any connections that do not fit in where the sewer hose is stored in a separate and sealed storage container away from any other hoses or accessories you use.
Where to dump?
That may sound like a silly question, but what if your campsite doesn’t have sewer hook-ups? If that is the case, usually the campground will have a “dump station” that you can use. The dump station is usually centrally located within the campground, perhaps as you exit. You may need to share it with your fellow RV’ers, so be patient.
What if the campground doesn’t have a dump station or there is something wrong with it? Then you will need to find another approved dump site. Try searching www.rvdumps.com for a place along your route. Some sewage treatment plants may have a hookup you can use, but you will need to seek them out.
Can’t I just dump them on the ground? Absolutely not!!! Obviously the black tank is going to smell and would be an unsightly mess for others to endure. And even though you might think the gray tank may only contain soapy dishwater or shower water, it could contain harmful bacteria or human fecal mater that would be harmful or deadly to plants or animals.
Not only would it smell and make a mess, many cities and/or states have laws against such dumping. Here is a link to a site all about gray water and here is a link to its page about state laws.
What do you do if you don’t have a sewer hook-up at your site and you plan to stay for a while and need to empty your holding tanks? Simple! Get one of these portable “tote tanks”. You just dump the contents of your holding tank into one of these and “tote” it off to the dump station. Although most people would recommend using a tote tank for the gray water, you could use it for the black water if you need to. Just make sure to clean it out really good. Use 1 ounce of bleach for each gallon of capacity to sanitize, and rinse out thoroughly. Use the campground restroom facilities as much as possible to avoid this situation, if possible.
Sewer hoses and connections
Toilet Paper
What type of toilet paper should you use in your RV? Almost any 1-ply and some 2-ply toilet paper should be just fine, but there is a simple test you can do to see if your brand will work okay in the RV. Take an empty mayonnaise or pickle jar (or something of similar size) and fill half-way with water. Put 2 sheets of the toilet paper in and put the lid on. Shake for about 10 seconds. Has the toilet paper begun to break apart? If so, it should work fine in your RV holding tank and the chemicals you use should be able to break it down. Some people report being able to use 2-ply without any problems while others have reported some problems using 2-ply and having problems with the tank level sensors. I’d suggest just getting the 1-ply and use twice as much if you’re used to using 2-ply at home. It might cost a little more to do it that way, but it beats the cost of replacing the black tank or dealing with faulty sensors.
Flushing
Now here is a touchy subject, so I’ll try and explain without getting technical.
The process in our trailer is simple (sort of)…any time anything solid is going down the toilet (like the toilet paper), you fill the bowl with water and then flush. If you are using the toilet to dispose of your own personal “solid waste”, hold the flush lever down while dealing with the task. This allows the solids to go directly into the holding tank as the water does a little rinse job on the bowl. When “the task” is complete (or almost), you can release the flush lever. Finish up with the toilet paper, fill the bowl with water and flush.
Okay, I hope I didn’t embarrass anybody, but this helps to ensure that there is enough water in the holding tank for the chemicals to do their job…break down the solids. So far, I have not had any problems with the holding tanks or with solids building up inside them.
Wednesday, February 18, 2009
Leveling and Stabilizing
There are leveling jacks
And there are stabilizers
Stabilizers do just that, stabilize. They do not lift, and are not designed to support much, if any, weight.
Leveling jacks, sometimes called "leveling stabilizer jacks", will (usually) be able lift and support some weight of the trailer. The BAL brand jacks that came on my trailer are rated to lift 5,000# each (there are 4 on my trailer). However, BAL also recommends that you not raise the trailer completely off the ground using the scissor jacks.
Regardless of which type you have, get the trailer level from side to side first. I would recommend to get some of the plastic leveling blocks. I like the Lynx blocks myself, especially now that they have a wheel chock add-on. They are real easy to clean off. If you need to raise it more than one block (1 ½”), put 2 flat on the ground and overlap another one on top of the bottom two. This will raise the tires 2 ½” off the ground and make it easy to drive on and off. I wouldn’t go any higher than 2 blocks because it may make it difficult or impossible for your stabilizers or leveling jacks to do any good without also adding some blocks under them as well.
It might be easier to move the trailer around to a spot that is a little more level.
You can also use wooden boards under the tires to level out the trailer. Make sure you use boards that are at least as wide as the tires are. A few half-inch and a few one inch thick boards should do the trick. You may be able to find some scraps at a local lumber yard for free. If not, and you end up buying an 8' long board, just cut it up into the desired lengths and you'll have some spares. You may want to consider painting or treating the wood somehow so it will last longer. For the length, consider if you will be using wheel chocks or not. If so, make the boards long enough to fit the tire and the wheel chock.
Once you have the trailer level side to side, unhitch and level it up from front to rear.
If you have “stabilizers”, put them down as firmly as you can to reduce trailer movement, but do not over-tighten as this may cause damage to the stabilizers.
If you have “leveling jacks”, you can use them to do some fine-tuning for getting your trailer level if the boards or blocks under the tires didn't get it close enough to level for your liking. Here is the process I have been using since 2001:
1. Lower the front of the trailer about one inch with the tongue jack.
2. Lower the rear leveling jacks until they are snug on the ground. If one side of the trailer is just a little higher than the other, crank the jack on the high side back up 1-2 turns.
3. Use the tongue jack to raise the front of the trailer to get the trailer level.
4. Lower the front leveling jacks until they are snug on the ground.
5. Raise the tongue jack slightly so that the trailer weight is on the leveling jacks and tires. Keep the tongue jack down in case one of the front leveling jacks fail.
You can also use this process to take some of the wiggle and bounce out of the trailer while you are inside. What this process does is take just a little weight off of the trailer suspension, which is where most of the wiggle and bounce comes from.
Some people will disagree with my method claiming it will torque or twist the frame and cause problems with doors or windows not opening/closing correctly. But I have confirmed this process with my dealer and the Fleetwood Service department, who all agrees that this process should not cause any of these problems if this process is done correctly. Check with your dealer or manufacturer to verify the correct leveling procedure for your trailer.
Make sure you have wheel chocks on both sides if you are on any kind of hill or slope. If you have tandem axles, use one of those wheel chocks designed to go between the tires, especially on the side that is raised up on leveling blocks. Camping World has a couple different varieties. Do a search for "wheel chock".
Hitch Setup
There are many different brands of weight distribution (WD) hitches, but the basic setup process is similar. Outlined below are the steps you will need to follow to ensure that your WD hitch is set up correctly. Should you change tow vehicles or trailers in the future you will want to do this again to make sure it is set up for the new tow vehicle or trailer.
These instructions are somewhat generic. You should consult the manufacturer’s instructions for additional information and exact assembly instructions.
The purpose of a weight distribution hitch is to remove some of the weight added to the tow vehicle’s rear axle and place some of it on the tow vehicle’s front axle and some on the trailer axles. When properly set up, the trailer should be level and the tow vehicle has settled (or squatted) evenly front to rear or slightly lower in the rear.
For optimum performance of the weight distribution hitch, the tow vehicle should be loaded similarly as to when you would be towing. That means that you should load all the people and cargo into the tow vehicle as if you were going on a trip with your trailer. You may want to do this near your home so that your family doesn’t have to sit in the tow vehicle while you take measurements and make adjustments. It may also help to have a friend take the measurements outlined below, or find a friend that weighs about the same as you to simulate you in the tow vehicle while you take the measurements.
If the tow vehicle has an automatic suspension leveling system, you will need to deactivate it before coupling the trailer to the tow vehicle, but after and passenger or cargo weight has been added.
Step 1 Level the trailer
Find a level piece of pavement to park on for awhile (this may take some time). With the trailer disconnected from the tow vehicle, use a tape measure and the tongue jack to level the trailer. Measure from the ground to some part on the trailer (like the frame) at the front and at the rear of the trailer. Use the tongue jack to raise or lower the front of the trailer until it is parallel to the ground. (The trailer may not be “level”, but it needs to be parallel to the ground.)
Step 2 Measurements
Now that you have the trailer level, it’s time to take some measurements on both the trailer and the tow vehicle. Use a piece of tape to mark each spot because you will need to take the measurements again later. Put a piece of tape at the spots you measured on the trailer to get it parallel to the ground. Put a piece of tape at the top of the front and rear wheel openings on one side
Write down your measurements here:
Tow vehicle front wheel opening height: ________
Tow vehicle rear wheel opening height: ________
Front of trailer height: ________
Rear of trailer height: ________
Measure from the ground to the top of the trailer coupler and write down the measurement here: ________
Step 3 The hitch assembly
There are usually three separate parts to the hitch assembly:
The shank. This part is what slides into the receiver on the tow vehicle and is usually in the shape of an “L” or a “T”.
The hitch head. This bolts onto the shank and is usually adjustable in height and angle.
The ball. This attaches to the hitch head.
I would suggest that you have an RV dealer or auto repair facility attach the ball to the hitch head because they will usually have the proper tools to do this. The nuts and bolts used to attach the hitch head to the shank are usually pretty large. If you don’t already have the right tools, I suggest getting 2 adjustable wrenches to do the job. If the hitch assembly is already put together, you may need an RV dealer or auto repair facility to loosen the bolts that attach the hitch head to the shank.
With the tow vehicle near the trailer, slide the shank into the receiver, insert the retaining pin and safety clip. Position the hitch head so that the ball height is slightly higher than the measurement you took of the trailer coupler. Many brands suggest 1/16” per 100 pounds of tongue weight (1/8” per 100 pounds for light duty trucks or cars). If you don’t know the exact tongue weight (from a scale), look for the tongue weight on the weight sticker on the inside of a cabinet inside the trailer. Close is usually good enough. When in doubt, set the ball higher than the coupler.
The angle of the hitch head is usually adjustable. Start with a setting somewhere near the middle of the available range. This is the part that may need to be adjusted again later depending on the final outcome. When you put the spring bars (sometimes called torsion bars) into the hitch head and pointed in the direction of the trailer, the ends of the bars should angle down towards the ground slightly. You can go ahead and try this now, but remove the bars before continuing to the next step.
Tighten all nuts and bolts before proceeding to the next step.
Step 4 Hitch it up
Raise the trailer tongue so the ball can fit underneath when backing the tow vehicle so the ball can be positioned underneath the coupler. Lower the trailer tongue until the coupler comes to rest on the top of the ball without putting much weight on the hitch and the coupler latch can be locked in place.
Using the tongue jack, raise (or lower) the front of the trailer until it is level again. Insert the spring bars into the hitch head and swing the other ends towards the trailer. With the saddles in their upright position. Lift up on the chain so it is close to the saddle. Lift up firmly on the chain and mark the chain link that is below the saddle. You will use this link as a starting point for hooking into the saddles.
Use the tongue jack to raise the trailer tongue about 2”. Remove the retaining clip and lower the saddles, insert the desired link into the saddle, raise the saddle back up to its vertical position using the removable handle/bar and insert the retaining clip. Use caution when raising the saddle back to vertical. Excessive pressure could cause the saddle to act as a sling-shot with the handle/bar. If you don’t have the strength to lift the saddle back to vertical, raise the trailer tongue a bit more and try again.
The end goal is to have the spring bars reasonably close to parallel to the trailer tongue. This may require one or more chain links dangling loose from the end, and may require that you use the tongue jack to raise the tongue slightly to accomplish this. Make sure the coupler is locked in place to the ball before raising the trailer tongue.
With both spring bars attached, chains snapped up and retaining clips in place, lower the trailer tongue so that all its weight is on the hitch and the tongue jack is not resting on the ground.
Step 5 Measure again
Take the same measurements you did earlier and compare them to the originals.
The “ideal” result is that the trailer sits level front to rear, the tow vehicle squats (lowers) a bit in the front (but not much), and the tow vehicle squats 1”-2” in the rear (depending on total tongue weight).
If the ideal result has not been obtained, don’t worry, it rarely happens on the first try. Depending on where things are not ideal will determine where you need to make the adjustments.
Troubleshooting
Let’s start with the tow vehicle.
A. Does the tow vehicle squat correctly (a little or none in the front and the same or a little more in the rear)?
If yes, move on to D.
If not, go on to B.
B. Is the front of the tow vehicle higher with the trailer attached than it was without the trailer attached.
If not, move on to C.
If yes, there is probably not enough tension on the spring bars. You will need to increase the angle of the hitch head according to the manufacturers methods. After making the adjustment, re-measure and start again at A. If this does not correct the problem, it may also be necessary to raise the hitch head on the shank.
C. Does the rear of the tow vehicle drop more than 1”-2” with the trailer attached?
If not, move on to D.
If so, there is probably not enough tension on the spring bars. You will need to increase the angle of the hitch head according to the manufacturers methods. After making the adjustment, re-measure and start again at A.
D. Are the spring bars close to parallel to the trailer tongue/frame (or adjusted according to the manufacturer’s specifications)?
If so, move on to E.
If not, you need to adjust the angle of the hitch head accordingly. Make the adjustment, re-measure and start again at A.
E. Is the trailer parallel to the ground or slightly lower in the front than the rear?
If so, this should do it, but check out G below (just in case).
If not, move on to E.
F. Is the trailer higher in the front than the rear.
If not, move on to G.
If so, you need to lower the ball by lowering the hitch head on the shank. If you have gotten this far, that means the tow vehicle is sitting reasonably well, but lowering the ball may change things. While making the height adjustment, also reduce the angle of the hitch head. Re-measure and start again at A.
G. Since you’ve gotten this far, the front of the trailer must be sitting lower than the rear, so here is the final question…
Is the height of the hitch head adjustable by less than the difference in height between the front and rear of the trailer?
Now that may sound confusing so let me give you an example. If the trailer is 2” lower in the front than the rear and the hitch head can be adjusted in 1-1/2” increments, then you need to make that adjustment, re-measure and start again at A.
But if the trailer is only 1” lower in the front than the rear and the hitch head can be adjusted in 1-1/2” increments, then that’s it!
With all of the different adjustments you can make, it may be difficult to find the right combination of hitch head height and angle. You may find yourself taking it apart and putting it back together a dozen times until you find the right combination. Make good notes as you make your adjustments so if you make a change and it makes things worse instead of better, you may need to make a different type of adjustment.
Congratulations!!! You have successfully set up your weight distribution hitch.
Now that you have everything hitched up and level, this would be a good time to see exactly how tall your trailer is. Measure from the ground to what you think is the highest point on the side of the trailer. Then climb up on the roof* to see if there is anything taller than where you measured to, like a roof-top air conditioning unit or vent cover. Add the appropriate distance, and add a few more inches for a safety margin. Write this measurement down on a piece of tape and stick it on the front windshield pillar (driver’s side of course) or some other convenient place. This way, when you pull into a gas station or approach a low bridge or other structure, you’ll know if your trailer will clear it or not.
Subscribe to:
Posts (Atom)